

How to Make a Zine
This guide covers:
→ Design (canva, procreate, hand written)
→ Printing (with templates for double sided prints, cause it drove me crazy to figure out)
→ Binding
→ Selling
Introduction
My name is Matty and I am an aspiring writer based in ‘Vancouver’. My work tends to gravitate to both the sun and the sea for inspiration and my writing is often produced off vivid emotion. I have been publishing zines for the last year and a half and have found such freedom through these projects. When I began my first zine, I really had to idea what I was doing so here inlays my process. I have collaborated with Jiggle n Juice in hopes of helping inspire timid writers and artists to put their art to the page and to assume their identity. To be an artist is to face rejection especially once you begin your journey applying to literary journals, exhibits, etc. The Zine to me, is a perfectly attainable approach to establishing your voice as an artist/writer. Everyone is an artist and everyone knows creativity. Let yourself be your own muse and create a perfectly bound physical project that encapsulates you and your art.
One day while I was at work, this was almost two years ago now, I had the honour of chatting with a well known screen-writer. She had sat down at the bar of my restaurant and opened her laptop, tapping away for an hour or so before she asked if I was an artist. I must’ve looked the part, and I told her, “yeah I just write, sorta”. She snapped back with “you don’t just write, you’re a writer”. Writer. This was a word I hadn’t yet allowed myself to claim because I didn’t think my work deserved it. I also didn’t have anything out in the world yet. She told me that if I continued to write, if I worked at it, if I shared what I had to say, I would be a famous writer. She was sure of it. She would look for my name in the news and on the shelves. She saw the hope and want in my eyes. “But before you can be one’, she warned, ‘you need to establish your voice. You need something that the world will see and say ‘damn, that’s a good poem, or book, I need more’.”
She was right.
Up until that point, I had a (naïve) plan of action for how I would become a working writer. My writing would exist in the safety of my notes app and nowhere else - that is until I somehow secured a landmark book deal that would transport me to The New York Time’s Best Sellers List, author’s talks and signings, and fancy parties in big cities. That however, is not a realistic chain of events. Fast forward 5 months from that talk to October 2022. I had just moved across the world to Melbourne and had saved enough money to allow myself to be unemployed for the first month. After a week of no work, of no waiting tables, of no cocktails, and no sore feet, I was hit with a concept for a collection of my writing. Nothing official or published in the traditional sense, but rather, a homegrown, homemade reflection of my creativity. That was where I called back to the concept of a “zine”. I had read a few in the past but never thought that I would have one of my own. But it was perfect, I would have total control over design, the cover, the length, the words - everything. This would be my introduction to the world as a poet and a writer.
Never heard of a zine? Let me tell you about this world of opportunity, for you, worthy writer/artist.
A zine, as defined by Google, is “a small-circulation self-published work of original or appropriated texts and images, usually reproduced via a copy machine. Zines are the product of either a single person or of a very small group, and are popularly photocopied into physical prints for circulation.”
In the 70s, 80s and 90s, zines acted as a grassroots way to disperse and share knowledge. For example, Queers Read This Now was a call to action leaflet/zine that was handed out at the NYC Pride March in June 1990. They were easy to print, cheap to photocopy, and easy to hand out. More commonly now, zines are pieces of art that translate the ideas and thoughts of the artist to the page. Whether that be visual art, poetry, essays - literally anything you want. They make it easy to disperse your work, and if you want, they can earn you a bit of money! In this tutorial, I am going to take you through my design process, printing options, binding, and ways to sell and/or distribute your zine. I hope that this guide empowers you, worthy writer/artist, to take the first step in establishing your voice in a self-published, beautifully produced, body of work.
Let’s start.
A note:
As I was writing this introduction, at the cafe nearest my house, a lady came up behind me and told me she had seen my digital zine on her instagram explore page. She told me she was totally engrossed in it, she hadn’t stopped thinking about it for a few days. She told me to never stop writing. And so for you, worthy writer/artist, let this be a sign to put your work out. Be bold and fearless, no matter how scary it may feel sharing your vulnerability. Step out of your head and realize you’ve already won. Everyone is a writer and everyone is an artist, if they so choose to follow it.
Part One: Concept
Let me begin by saying this: there are no rules for you to follow. I am here merely as a guy that has done this before and wants to share his process from his perspective. Let the design be totally and completely yours. I think there is a lot of power in letting things flow naturally without force. Take a walk, hit your vape, stretch, sit at the beach, listen to your favourite music, go rave, lay and stare at the sky - whatever helps your body flow inspiration. Then sit down and begin. For me, ideas usually hit me out of nowhere, which is why my notes app is my best friend. Lets take my first zine as an example;
I had been at the beach and was thinking about how my head sort of felt like my very own garden of eden. In it, peace, innocence, negativity, freedom, restraint. And then I thought about the physical, the beach is my garden of eden. An (almost) perfect place (minus the hungry birds that peck and caw). It is where I settle. So I wrote a piece about it. From there, I decided that poem would act as the preface and inspiration for the entire poetry zine. Bam. I had a title and concept; In My Very Own Garden of Eden (IMVOGOE) unforced and natural. From there, I researched the garden of eden a bit further. I looked for themes I wasn’t aware of, imagery, stories, etc. I’m not religious per say, but I have always found the idea of a perfect world alluring. I’ve also always loved renaissance, and rococo art - especially those that dealt with classicism. Being a Greek, I’ve always felt connected to artwork that spoke on mythology and ancient lore. What can I say, we’re a proud people. Pinterest is a really great place to help with inspiration because the algorithm is incredibly intuitive and offers a lot of suggestions that you may have never thought of. If you’re having a hard time beginning, look to other art. It may inspire something completely new.
Part Two: Cover and Internal Design
For your cover, there are a million and one ways to go about it. If you are talented with a pen or paintbrush, let your cover be another body of work, of visual art. If you prefer minimal design, find a font that connects with you and set it on a coloured backdrop. (dafonts.com is a good place to look, just make sure you’re using something readable) I am going to touch on four different ways you could approach the compilation and design process. Again, let this be yours, worthy writer.
A) Canva:
I really could go on forever about how valuable Canva is for creators of any kind. Their templates are great or you can choose a blank canvas to start from. It does have a free format, though I personally decided it was a good investment to pay for a premium account so that I could import fonts and resize my projects without worry - but the free platform is extremely generous. So no need to spend any money if you are not able to. For myself, I used Canva to design and compile my poetry onto what would later be the physical page. It is super user friendly and easy to format. You can also copy and paste easily between pages for consistency, it has ruler and spacing help for centering, and options for text customization (transparency, spacing, effects, etc). You can import photos on the page if you want to have cute graphics or photos, you can insert your own designs through the app like shapes and colour gradients - canva really does it all. She’s a superstar.
B) Procreate on iPad:
For me, I love digital collaging. I find it therapeutic and a fun way to transform art from the 20th century, or photos I’ve taken, into new bodies of work. When I began designing the cover for IMVOGOE, I was living with my friend who is a tattoo artist and owned an iPad and pen. So I used hers to digitally collage the cover. I later bought my own as we no longer lived together, but there are many online programs to use for digital editing - try Pixlr for a free photoshopping experience. I find using the trackpad/mouse and trying to collage a bit tricky but its possible. Aside from collaging, Procreate (or Pixlr, or Adobe products or Adobe alternatives) are all really great for making your cover, or designing each page.
On Collaging:
Don’t feel constricted, however, if access to these tools are not possible. Physical collaging is wonderful and takes on a very different feel. All you need is a stack of thrifted magazines or books - or alternatively - find the images you want for your cover and print them at a printing shop. Then all you need is a glue stick and some scissors. It is a beautiful and super low cost way of creating.
On Procreate, you can download/buy different brushes to help you with design (eg: clouds, grass, sparkles, chains, etc). Etsy has a really lovely selection, or you can simple google “Procreate brushes” there's many free ones.
You can also freehand draw, or you can digitally paint. It really is an endless world of opportunity. The only thing I urge you to do (because I didn't), is to figure out what size your canvas needs to be for printing before moving onto this step. I did not and ended up having to redo my cover because the title would not fit.
You can also use Procreate to create the entire zine! For my digital zine, Certified Playboy I decided to use the iPad to handwrite each poem and insert my own pen graphics, and edited backgrounds. See below to see how Procreate was used for this zine.
Written by: Matty Vasilis
Edited by: Shae Myles & Georgia Tooke


C) Handwritten/Physical:
The handwritten format harkens back to the most pure form that the zine can take - I’m not a purist and I make a million and one mistakes when I write with a pen - though I see you, worthy writer. You can do anything you like with this format. You will however, need to get it onto the computer if you are choosing to have it in a long format - in which case you can scan it to a computer and then insert the images onto a Canva or Word document.
Though if you like the handwritten approach, the traditional folding zine gives you full access to make your zine OFF the screen - you will however be hit with an 8 page limit. More on that further down.
D) Microsoft Word/Google Docs
While I personally am not in love with using these applications for design, I think they are a really great starting point for simple compilation. It is meant for writing, after all, so it does exactly what we are set out on doing. Text design is simple and if you don’t want your pages to have much on them, this is a great app for you. I personally tried to format a zine on Word and almost lost my mind attempting to. Great for basic printing, yes, integrating photos and more complicated formatting, she is not.
Part Three: Printing: Feeling the Page
Zines started out as booklets or a folded up single piece of paper, making the printing process cheap, easy, and low cost. This is at its heart, what a zine is meant to do. There are a few ways you can choose to print your zine.
a) Traditional Single Sheet fold:
This is the most accessible, most simple way to create your zine. Though, there are some pros and cons - lets list them:
Pros:
Once folded, easy to hand write on
Accessible
Cheap to photocopy and print
Total freedom with hand design
Cons:
Limiting in length
Not as easy to digitally design (but possible!)
I really love the scrappiness of these zines. They’re simple, they're effective and they’re artistic af. This is the best option for something short, sweet and simple. Perhaps you have an essay you want to get out on paper, this form gives a “book” feel without the extra costs of binding and is the most cost effective. This is the best format if you are looking to share your work for free as well (unless you go purely digital). The other two options are going to come with some costs. 42nd Street made a really lovely folding guide with visuals; take a look at the image here.
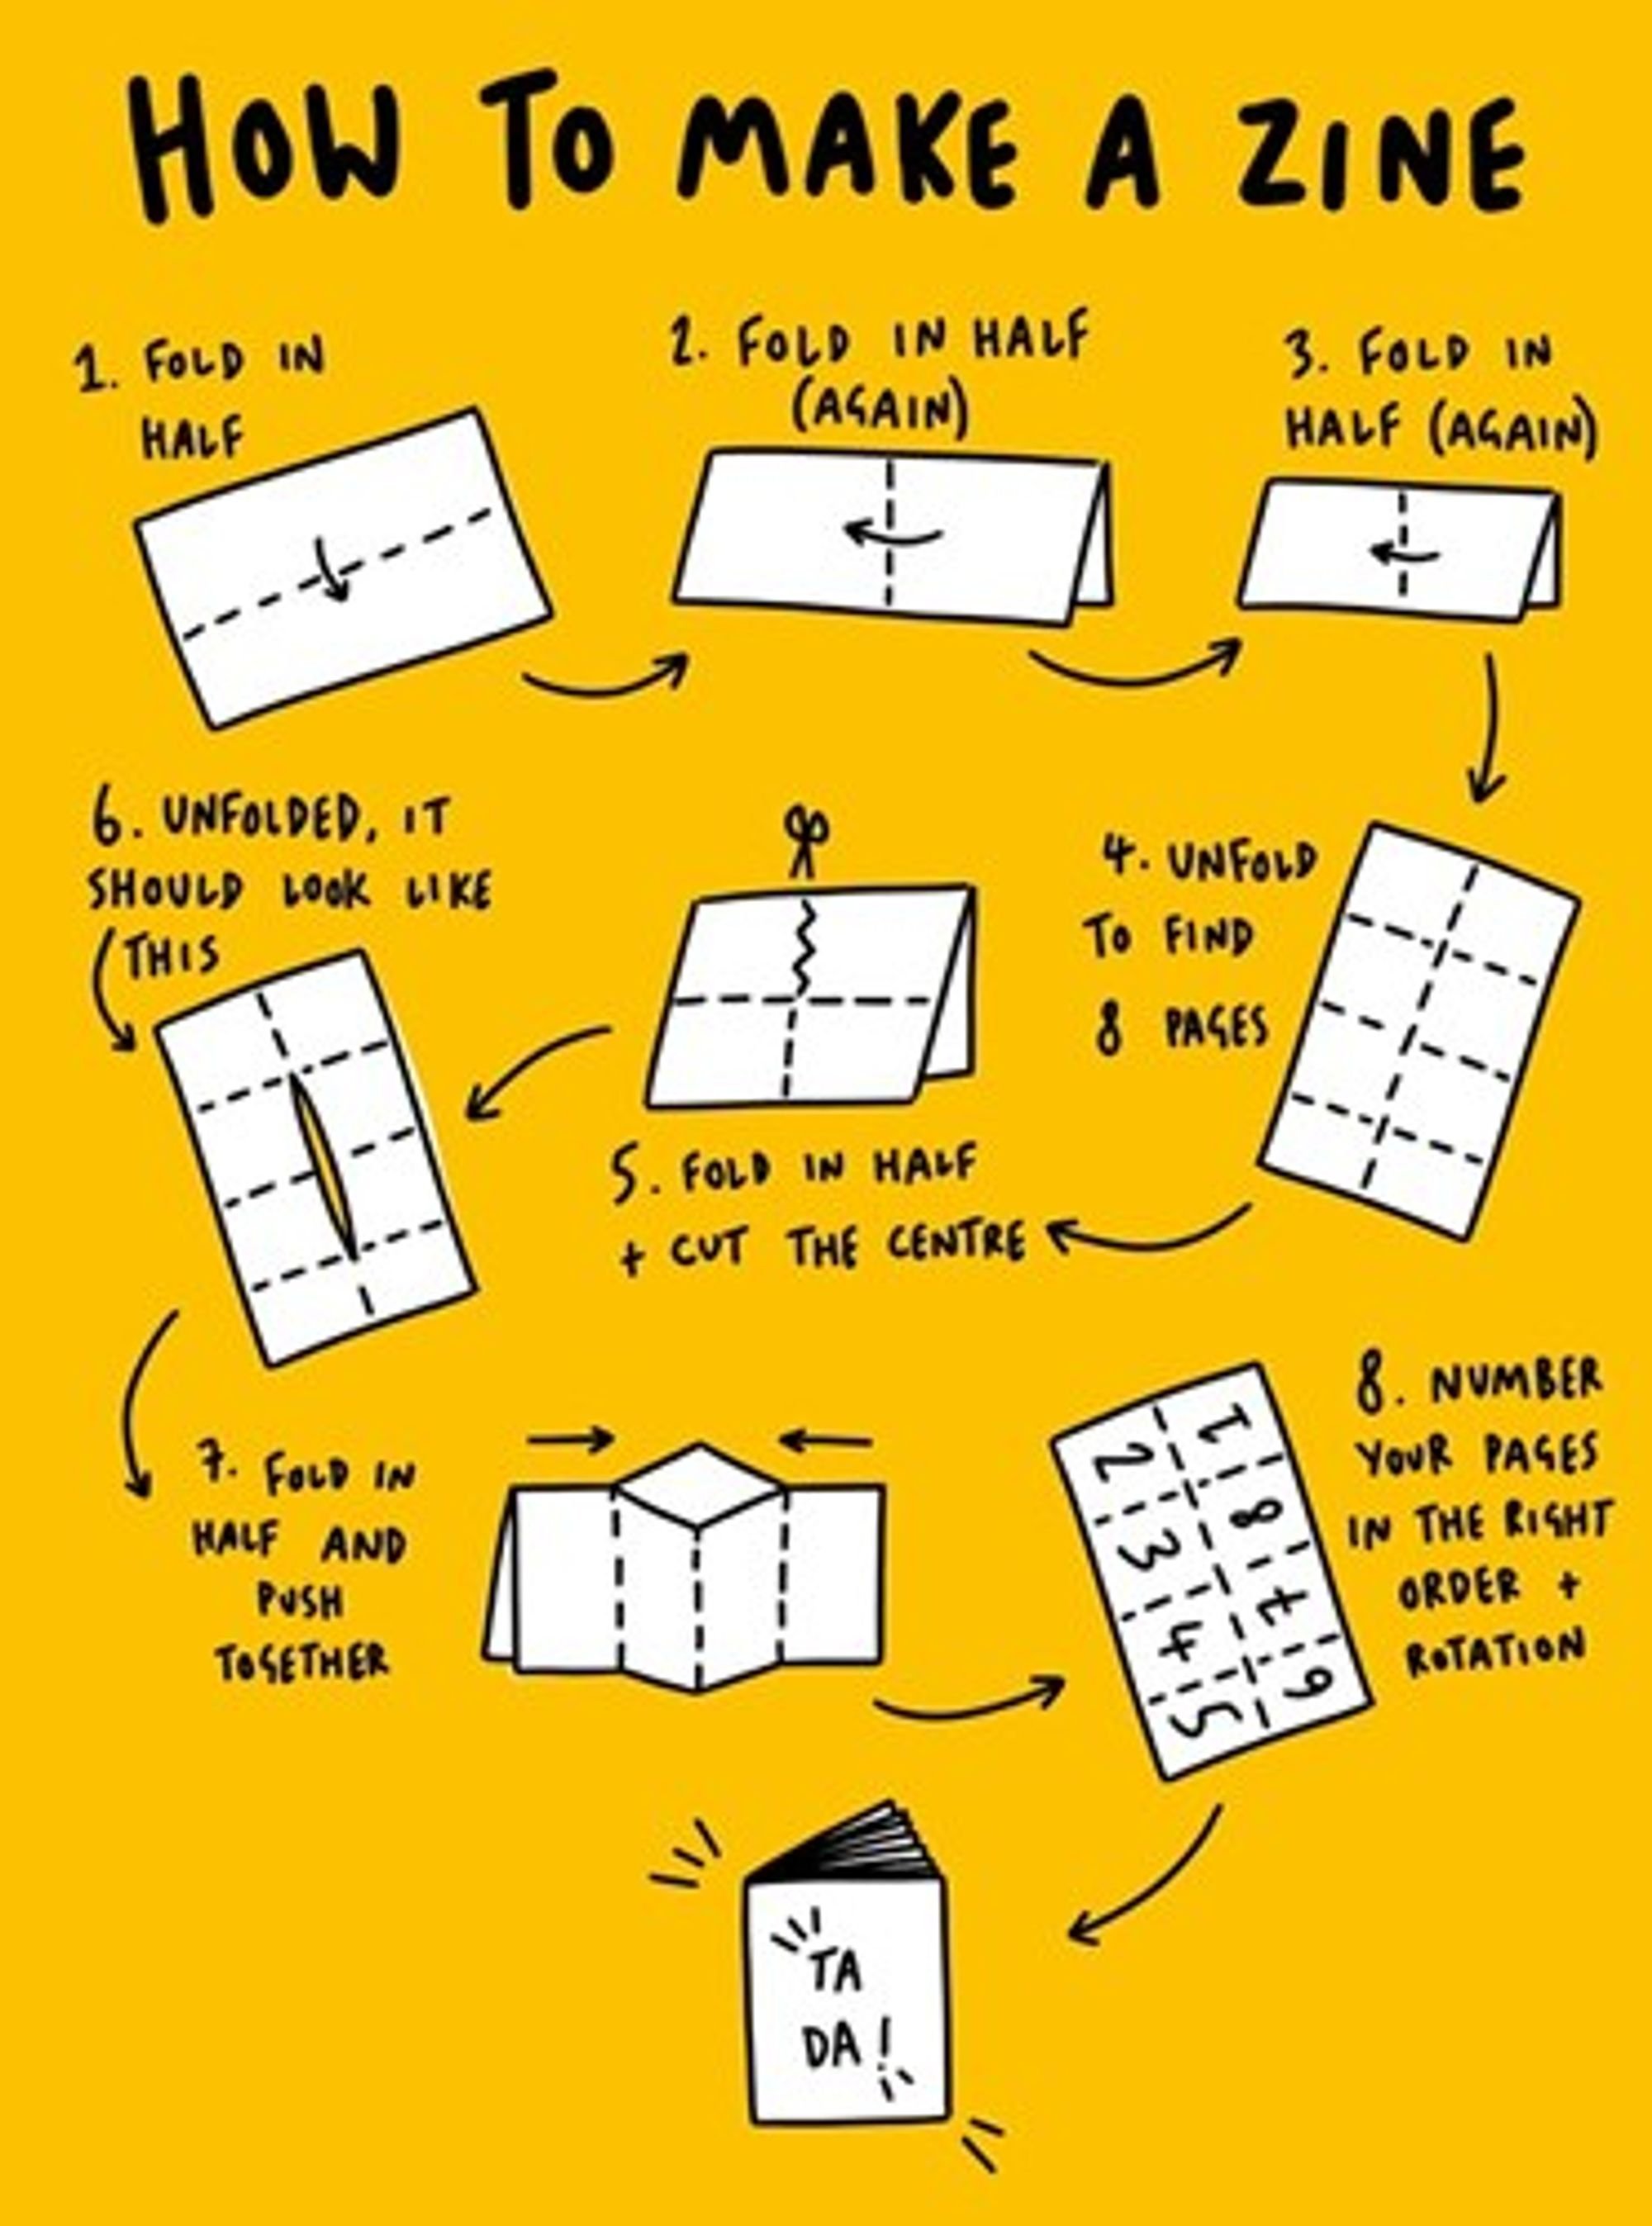
Either you can take one piece of paper, write on it and photocopy as many copies as your writing heart desires - or you could make your folders, cut out physically glue printed work onto it, then photocopy that. The world is full of possibilities and so is your zine.
b) Double-Sided Print:
I would call this the middle child of the zine world. It appeases both the ease of the traditional fold, but takes a bit more effort. I chose this option when I did a limited run of physical copies for Certified Playboy. Again, let us look at the pros and cons
Pros:
Easier form for digitally designed projects
Can be flipped through more like a book
Gives you more options for paper thickness (if you want the cover to be on a heavier cut)
Cons:
Takes some real effort with formatting pages
Needs a form of binding
Will cost you more than the traditional fold
For this form, you will need some sort of secondary application to format it. That is of course you are handwriting it - in that case - take the amount of paper you will need to accommodate the length of your zine, fold them in half, and begin. After that, similar to the traditional fold, you will just need to make photocopies of each page.
Now, if you are digitally designing it, Canva is a really fabulous way to format it. Take note that each page won’t go in traditional order because the pages will be folded once you print them. Since I created Certified Playboy on procreate, I was able to save each page as its own PNG file. I then imported each one to Canva. See below for a step by step guide on formatting in Canva
Set your page size to traditional letter, or A4 (whichever type of paper you will print it on)
Set the orientation to landscape
Begin inserting each page of your design (from procreate, word, etc) as images files. PNG is best for highest digital quality as the layers are not totally compressed.
There can be a white border - don’t worry about that. You can use a paper guillotine or scissors to cut the edges.
Make sure that the pages set beside each other are perfectly centered in the page together or when you print it, you’ll end up cutting off some of the pages.
Order it as such, I will use Certified Playboy’s page count as an example:
First Canva Page:
Back Cover (can be nothing) - Front Cover
Second Canva Page
Blank page or Page 1 - Page 10
(I say blank page or page 1 because some people want the book to start on the second page. I opted for a photo page to use some unused shots I liked from the cover shoot)
Third Canva Page
Page 9 - Page 2
Fourth Canva Page
Page 3 - Page 8
Fifth Canva Page
Page 7 - Page 4
Sixth Canva Page
Page 6 - Page 7
Adjust for your page count as needed but follow that for a general format. It was confusing as hell for me at first to figure it out and took many reprints to get it right. I know I used the word ‘page’ a million times there, but bear with me, it works.
Now pick your printing poison. If you have your printer with colour ink - go for it. I’m not sure how budget conscious it will be compared to heading to a printing shop. I went to Staples for Certified Playboy and got it done on a slightly thicker paper cut (free of charge) and each copy cost me about $4 to print. It's bloody expensive to print anything, so, with the cost of this approach, it is best to choose this way if you are looking to sell copies, unless you’re okay with eating the cost.
The next step you’ll need to take with this approach is cutting off the extra bits and binding.
For getting rid of the white borders (unless you have designed your work to perfectly fit into folded in half piece of letter size paper, which in that case you are a intelligent wizard) many print shops have paper guillotines that will give you the cleanest and straightest cut. I had the privilege of borrowing one from my work. But reach out on instagram, or with your friends, especially those in school or that have offices! Many university campuses have a paper guillotine somewhere. Otherwise, grab your scissors and buckle down for some hand cramps. It’ll be worth it in the end! I promise!
Then you need to bind. You can grab a stapler and punch two in the fold, and bam you’re down. However, I personally love the look, feel, and process of thread binding. I did it with Digital Playboy and it gave it such a cute and more polished look. There will be costs, of course, with this step but again, they were relatively low. If you want to hand thread the binding - read on:
What you’ll need
Embroidery thread (purchased at art stores, usually 80 cents or so for a very long piece, it goes a long way and you really don’t need too much)
Embroidery needles
A dream
I went to Michaels (Canadian equivalent to Hobbycraft) and four different embroidery threads, and needles cost me $12 total.
Now here’s how you do it
Step 1: Loop the a 40 inch piece of thread in the needle and tie it around a couple times so its secure. This will probably leave you with some wasted embroidery thread, if you can streamline the size perfectly, that is fabulous, I just like have extra so I have something to work with.
Step 2: Start with the folded pages open, poke a hole in the center of the crease so that the thread travels through towards the ground/table. Tie a tiny knot so it stays in place but keep your finger on the thread so it doesn't fall through.
Step 3: Looking at the zine from the back/front cover side, poke a hole half way up somewhere in between the top of the paper and the centre loop. It really depends on where you want it, no spot is the wrong spot.
Step 4: Now that the thread is back inside the middle pages, loop it back through the center hole that has already been made.
Step 5: Flip the book around so you’re looking back at the beautiful back and front cover side, and do another poke on the bottom half of the book.
Step 6: Flip it around and thread the string through the middle hole once more.
Step 7: Repeat this so that it has been done two times on the top and bottom. That way it’ll be nice and sturdy,
Step 8: To complete the bind, you’ll have the last of your thread in the middle loop on the inside pages of the zine. Tie a knot so that its close to the paper, cut off the extra string and you’re done!
This is a step by step for a simple bind, but youtube has many intricate and fancy binding options. Do whatever suits your fancy! Below is a little video/voice over how to I did while I was binding a zine I made for my partner for his birthday.
c) Booklet Printing:
This approach is probably the most hands off way to print your zine, and the most expensive. I did it for In my Very Own Garden of Eden when I lived in Melbourne and it cost me $11 AUS to print each copy, which gagged me a bit for sure. I thought it would be much cheaper, but they cut the edges off for you and bind it with staples. This approach is nice if you have a big book as it’s a big undertaking, but again, not extremely cost effective. I’m not going to do a pro’s and cons list because, quite honestly, it’s mostly pros.
Simply design your zine, in whichever approach you’d like - I would say digital design is the format that would call for this approach the most - and bring a pdf copy to the printing house. I forewarn you, some places will ask you to organise the pages as it would fold in a book, add blank pages, etc - if you need to do that. Some pages may need to be blank, like a traditional book would be. You can also thread bind over the staples that the shop uses to bind it if you want some extra flare.
Part Four: Digital
Now, this is totally not what the traditional zine set out to do. By nature the zine is printed, it is tangible, it is in your hands. However! Zines have no rules so who cares. I chose to do a primarily digital zine format for Certified Playboy. I decided to have its main home be Instagram for visibility, so I had to stick to a 10 slide/page limit. I also uploaded it to a fun website called issuu. The website’s design allows the reader to flip through the zine like a book and it gives you more freedom with page limit. I am currently using the free version but there are some limitations so read up on the premium vs. free features before you embark. It's costly but it may be worth it for you. Another option is to upload it as a pdf do google drive and have a direct link to that so people can scroll through it.
The beauty of the zine is that it's totally customizable and no one can tell you you’re doing it wrong.
Part Five: Selling
So you want to be a working writer? Me too. Selling your zine can definitely be a source of side income, although it might be best to set your expectations. I sold mine mainly just to disperse it while covering the costs, and honouring the time it took for some financial compensation. Capitalism begets capitalism, unfortunately. BUT my audience is still quite small, so perhaps you have a tiktok following and it will go viral and thousands of people will buy one. In that case, godspeed on the bulk binding process.
In my experience, I found instagram the best way to sell it. I posted about it, let my unwavering fans (friends) know that they could DM me for purchase, and off it went. I also chose to make it available for shipping, and just sent it in an envelope with a $2.50 stamp. Mainly because I have travelled a lot and was in Australia at the time of my first zine being released. I knew my friends home in Canada would want to buy some, so shipping was a must.
I also got in touch with a really cool zine book store (Fiend Bookstore) located in Melbourne (Check them out) and they agreed to carry my zine! The most surreal thing was seeing it on the shelves. I didn’t need to sell a single copy, having it in a bookshop was enough for me.
Also check out your local art scene. I know here in Vancouver, Zine Fairs exist and happen quite regularly. I have not yet participated in one so I can’t speak too much on the process, but it's out there.
As for cost, I know as an artist/writer it can be hard to put a price on your work. For me, I found keeping it financially accessible, while also honouring my time and work, as well as costs helped me find a fair price. In My Very Own Garden of Eden was $20 plus shipping, and Certified Playboy was $10 plus shipping. I found doubling what costs were was the most fair way to price my work. Again, this is different for anyone and there's no right or wrong way to price your work. Do what makes you feel valued.
Thank you so much for reading this support guide on How to Make a Zine! The best part about making zines is that there’s a million ways to do them so hopefully you’re feeling inspired and are ready to make your own! If you do, send us a pic or tag us in a post - we want to see your vision come to life!
We’re so thrilled that Matty wanted to share his experience and insights into his process! If you have a special skill or want to share a support guide through our platform let us know!!! Email us with and idea or proposal with what support resource you wanna share OR you wanna see from us next!
✹✹✹✹✹✹✹✹✹✹✹
If you liked this support doc and found it useful, consider becoming a Patron!! Each of these guides can take upwards of 20 hours to create and we do it FOR FREEEEE - you can show your support for as little as £1.50 a month if you’re able to. We would be so grateful, and it’ll mean we can keep on creating these guides and ensuring they are accessible to all!
READ MORE/BECOME A PATREON HERE!
Remember these are some tips to get you started, and that we’re both learning and growing with you! If you think we missed anything in this guide, just let us know!
Lots n lots of luv,
Shae and Georgia xo